
Flutter has become a buzzword for programmers and entrepreneurs. It gained popularity in the last few months for its benefits. Nowadays is opted as an alternative to React Native. Flutter has been around for a while now, but it commenced gaining more lookout when Google proclaimed unleashed a preview of Flutter. For all the programmers who want to know how to build Flutter app and how to release a Flutter application after, you are at the right place.
The long list of the usefulness of Flutter has already knocked down many challenges for coders to build a cross-platform application with a native experience for various platforms like Android and iOS. All this happens with the same code script for all the platforms. And thus, it preserves time and resources.
After the announcement of its first stable version, Flutter has made it far more manageable for programmers offering a progressive level of software development kit that yielded all the widgets and plugins. When creating an application with Flutter, it is leisurely to tackle the complexities that have to be dealt with as it allows little to code.
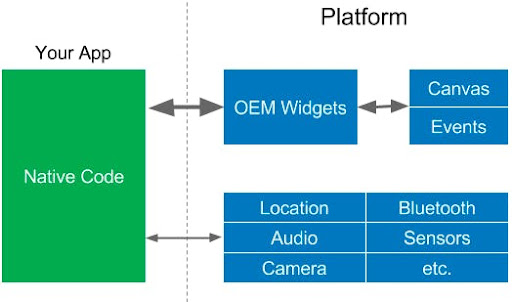
In Flutter, Widgets cover the major tasks. Widgets are the components that influence and control the appearance and interface of an app. Flutter renders the widget tree and smears it as a platform canvas. Right from rendering engines and ready-made widgets to testing and incorporating APIs, Flutter serves all things.
Prerequisites
We are about to instigate knowing some requisite steps before penetrating into a primary subject which is creating an app with Flutter. It would require some installation of some software and extensions and ensuring that we are all set with the required tools before developing. To begin with, one can use either macOS, Linux, or Windows – however, macOS allows the installation of iOS and Android platforms on the same machine. There are many code editors like Visual Studio, Android Studio, and Sublime Text; one can use any of the available platforms which allow coding in Flutter.
Wants to launch a cross-platform app?
Our Flutter Developers will provide you an incredible solution with rich features & extraordinary performance in accordance to your requirement
Install Flutter
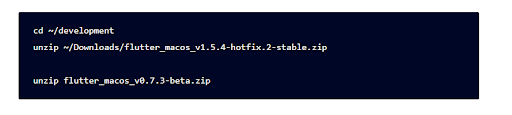
Obviously, and you would require Flutter! You can use any operating system to commence with Flutter. Further, install the Flutter software development kit, then insert it into the PATH so that we can take charge of the Flutter binary anywhere in the world. The foremost measure is to get a Flutter software development kit and unzip it to an appropriate spot on our disk. We can do this by operating the subsequent instruction:
After that, add the Flutter path so that it gets accessible globally.

After that, you will be able to exemplify the installation by running it.

This command will publish all functional instructions of Flutter
VS Code Extensions
As with any other coding language, Visual Studio is an excellent IDE for Flutter. With Flutter extension, it also offers various flutter commands that can be run from VS Code. To quicken the devising procedure with Flutter, some of the extensions operated are
Flutter: Select Device is also used while debugging the app on Android, iOS, and the web.
Android Studio
If you are working on Android Studio, install it first. Then go to the Android Studio Setup Wizard and get all the essential downloads with the most delinquent Android SDK that are necessary for Flutter. You can also set up an external device or emulator to build in Android.
Know Pub Package Manager
Flutter consumes the Pub Package manager to steer the Dart packages within the Flutter assignment. One can also pubspec.yaml file in the Flutter assignment, which will take on Dart dependencies to the task. Operating the below order, one can mention and install all the reliances.

One can also use the below command to update all the reliances:

Also, go through the Pub Package Manager thoroughly so that you can comprehend the Flutter app better.
How to Build Flutter App?
We are using Visual Studio to build a Flutter app. We have installed all the essential tools mandated in the process.
To start with, go to View => Command Palette
Type “flutter” and Flutter: New Project, then insert the name of the new assignment and move forward.
Determine the parent directory for the new assignment file.
In a bit, your assignment will be prepared with the default counter template.
The startup file of the app is main.dart under the lib folder.
Sometimes files will be required to compose settings and plugins, but that is restricted.
Attach an external mobile phone to it or an emulator or simulator and check the code if that is working. On fortunate takeoff, you can see the counter app working on your attached device.
How to Deploy Flutter App?
To deploy the flutter app, you will require an account respective application store which can be paid account and will allow posting the cross-platform apps separately in both. We will see how to deploy the Flutter app in Play Store and App Store Store.
Deploy Flutter App to Android Device
Name the app
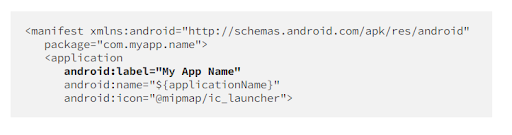
After devising the developer account. Open AndroidManifest.xml (android/app/src/main/AndroidManifest.xml) and revise the android label.
The label is the title of the app that will be shown on the respective devices with the same OS.
Generate Keystore
Before deploying the app to the platform, a keystore will be demanded to sign it. Use the following command:
Windows

Linux/Mac

Keep a new password and save it for later purposes.
Move the key file in the assignment.
Push the key file to android/app, and don’t fail to insert the keystore into .gitignore if you have public storage.
Generate a Key.properties file
Create the “key.properties” file that broaches to keystore within the Android file. Open the file and add the content in it, revising it with the Keystore values.

Change build.gradle
Go to android/app/build.gradle and edit it
Build the App
Then build the app as appbundle, so it can be deployed to the application store.
Run in your terminal:

If you are operating flavors, run:

You will then get a message in the terminal delivering your output folder where the .aab file is situated.
Deploy the App
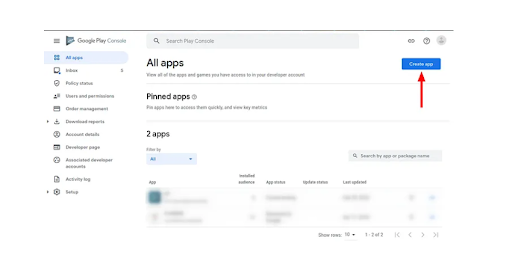
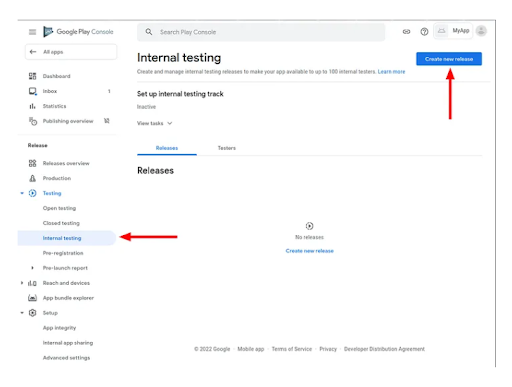
Go to Google Play Store, and in the developer account, click on “Create App”
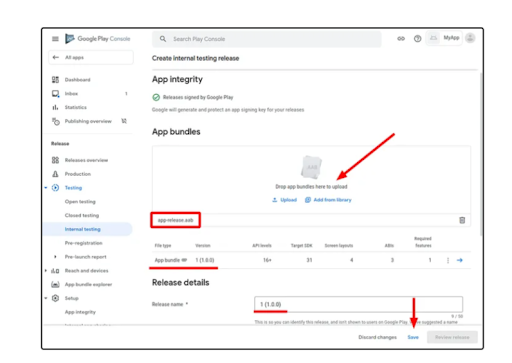
Go to “Internal testing”, produce a new release, and upload you .aab
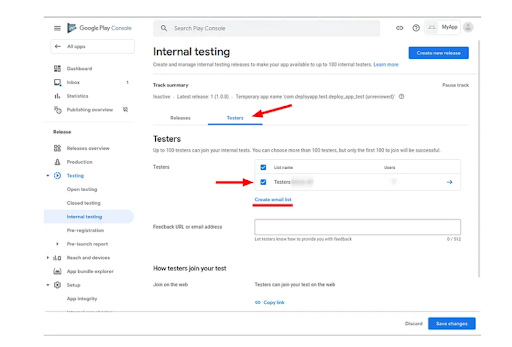
Add testers to the “internal testing” release, constructing an email list
Deploy Flutter App to the iOS Device
To deploy the Flutter app to iOS Device, you should have XCode, which needs a Mac device.
Naming
Name the app and bundle whichever you want, utilizing any language you want. Some terminal commands would be running over to modify the title of the Flutter app.

Install a third-party package manager that enables to manage of the plugin wherever required
Roll forwards to locate the Runner.xcworkspace file within the iOS file in our project directory. Then we require to unlock this file on the Xcode with a double click.
Go to the signing and Capabilities and add an account there. Use your credentials of Apple ID to log in to the app.
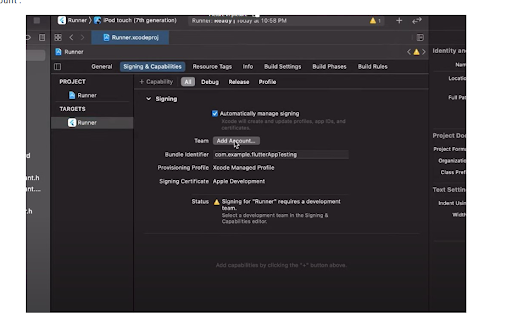
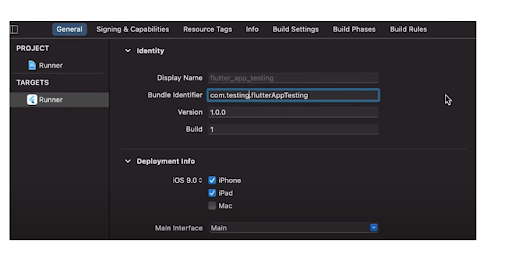
Then, go back to the General tab and modify the Bundle Identifier to something unique.
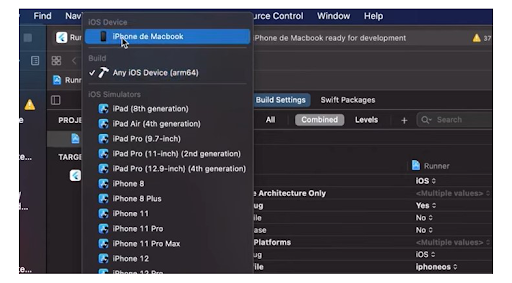
Connect to an external device and then press the Play button. Press the play button on the left menu bar, which will initiate building the app on the iPhone. Then your app is successfully constructed and deployed and is prepared to try on the iPhone.
Your Flutter App is Ready!
That sums up how to build Flutter app and how to deploy a flutter app on Android and iOS devices separately. Flutter offers many benefits to geeks and to the business when preferred to build cross-platform applications.
If you, as a business, want to develop a flutter application, Elluminati leverages to hire Flutter developers who are protean to build highly scalable and reliable applications for any size of the business.